Install Windows XP from USB Flash drive - WinToFlash Guide
Wrote a comment about WinToFlash.
To make us easier install Windows from an USB Flashdrive, Pen drive, Flashdisk, etc... with WinToFlash you can install Windows XP/2003/Vista/2008/7 from USB Flashdrive easily.

WinToFlash Step by step Guide Install Windows XP from USB Flash drive:
Requirements:
- USB Flash disk/Flash drive/Pen drive/Thumb drive, etc
- Computer with CD/DVD drive to build this Windows XP setup Flashdisk
(or you may use computer without CD/DVD drive, but you have to copy Windows XP setup files from another computer to your hard disk)
- Computer with or without CD/DVD drive (e.g. Aspire One)
Step 1:
Download WinToFlash here http://wintoflash.com/download/en/
from the Author: This software may contain bugs (spelling too).
so if you find any spelling error please write a comment and correct it
or report to support@novicorp.com
don't forget to write your WinToFlash version.
Step 2:
Extract the zip file, then double click on WinToFlash.exe
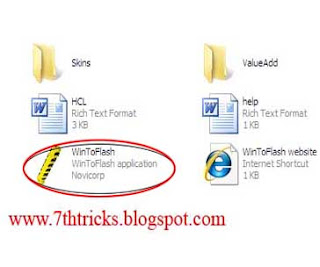
Step 3:
Click Accept button...
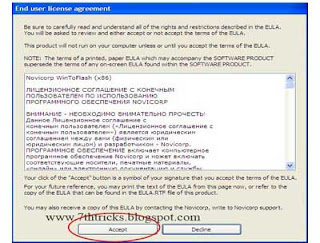
Step 4:
This program will transfer Windows setup from CD or DVD to flash drive Recommended to switch on Wizard mode for users have no experience of Windows setup fine tuning Windows setup transfer wizard Following basic instructions you will transfer Windows setup program to flash drive and install Windows on PC have no CD or DVD drive
Click the button to enter Wizard mode...
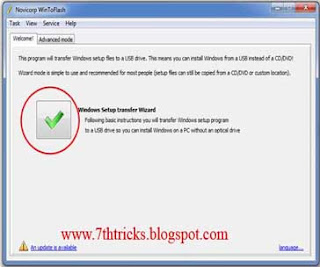
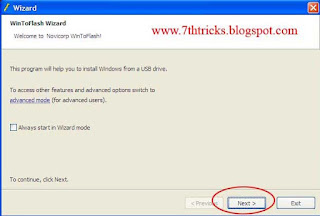
Step 5:
This program will help you to install Windows from a flash
To access other features and advanced options swicth to advanced mode (for advanced users).
for now, we will use wizard mode instead of advanced mode, so click Next...
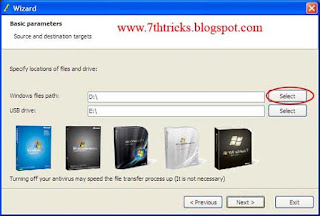
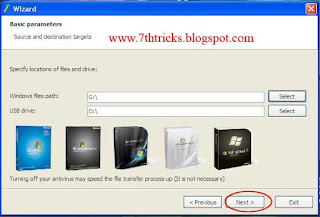
step 6:
Specify locations of files and drive
on Windows files path click Select button
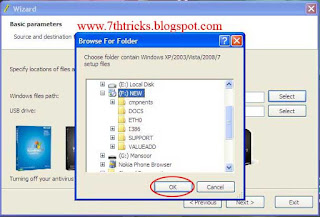
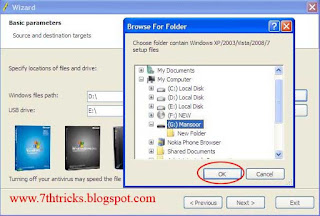
Step 7:
Select CD/DVD drive that contain Windows XP CD or folder that contain Windows XP files... then click OK
step 8:
Specify locations of files and drive
on USB drive click Select button

Step 9:
Select USB Flash drive ... then click OK
Step 10:
Specify locations of files and drive
Click Next button...
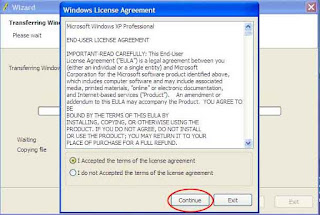
Step 11:
Select "I Accepted the terms of the license agreement" then click Continue...
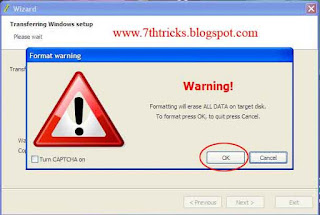
Step 12:
Warning! Formatting will erase ALL DATA on target disk. To format press OK, to quit press Cancel
Click OK...
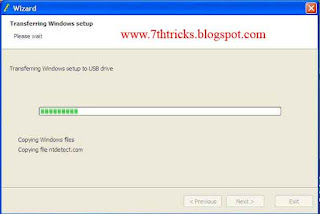
Step 13:
Please wait while WinToFlash transferring Windows setup to flash drive
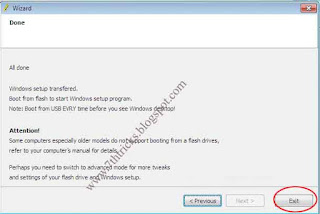
Step 14:
Finished... click Next then Exit
USB Flash drive ready...

On computer without CD/DVD drive (e.g. Aspire One)
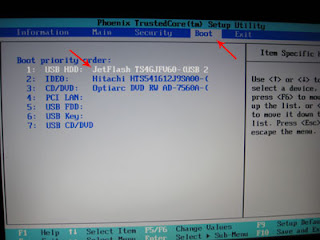
you must change the first boot order to USB Flash drive from BIOS. How to do this?
Change Boot order from BIOS:
This is just for example (Aspire 4710)
your BIOS interface may be slightly different
Step 1:
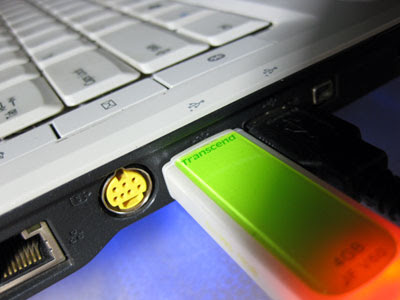
Plug a Flash drive into a USB port on your computer/laptop
Step 2:
Turn on your laptop then hit F2 rapidly (or Del for some other machine)
then go to Boot tab > change boot order > then hit F10 key to Save and Exit
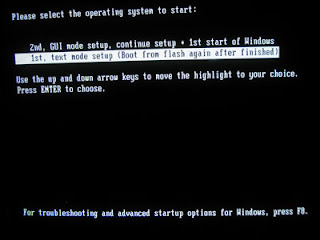
Now you can boot from USB Flash drive, first select
1st, text mode setup (Boot from flash again after finished)
then... on the first restart, select
2nd, GUI mode setup, continue setup + 1st start of Windows
Install Windows XP as usual...
To make us easier install Windows from an USB Flashdrive, Pen drive, Flashdisk, etc... with WinToFlash you can install Windows XP/2003/Vista/2008/7 from USB Flashdrive easily.
WinToFlash Step by step Guide Install Windows XP from USB Flash drive:
Requirements:
- USB Flash disk/Flash drive/Pen drive/Thumb drive, etc
- Computer with CD/DVD drive to build this Windows XP setup Flashdisk
(or you may use computer without CD/DVD drive, but you have to copy Windows XP setup files from another computer to your hard disk)
- Computer with or without CD/DVD drive (e.g. Aspire One)
Step 1:
Download WinToFlash here http://wintoflash.com/download/en/
from the Author: This software may contain bugs (spelling too).
so if you find any spelling error please write a comment and correct it
or report to support@novicorp.com
don't forget to write your WinToFlash version.
Step 2:
Extract the zip file, then double click on WinToFlash.exe

Step 3:
Click Accept button...

Step 4:
This program will transfer Windows setup from CD or DVD to flash drive Recommended to switch on Wizard mode for users have no experience of Windows setup fine tuning Windows setup transfer wizard Following basic instructions you will transfer Windows setup program to flash drive and install Windows on PC have no CD or DVD drive
Click the button to enter Wizard mode...

Step 5:
This program will help you to install Windows from a flash
To access other features and advanced options swicth to advanced mode (for advanced users).
for now, we will use wizard mode instead of advanced mode, so click Next...

step 6:
Specify locations of files and drive
on Windows files path click Select button

Step 7:
Select CD/DVD drive that contain Windows XP CD or folder that contain Windows XP files... then click OK

step 8:
Specify locations of files and drive
on USB drive click Select button

Step 9:
Select USB Flash drive ... then click OK

Step 10:
Specify locations of files and drive
Click Next button...

Step 11:
Select "I Accepted the terms of the license agreement" then click Continue...

Step 12:
Warning! Formatting will erase ALL DATA on target disk. To format press OK, to quit press Cancel
Click OK...

Step 13:
Please wait while WinToFlash transferring Windows setup to flash drive

Step 14:
Finished... click Next then Exit
USB Flash drive ready...


On computer without CD/DVD drive (e.g. Aspire One)
you must change the first boot order to USB Flash drive from BIOS. How to do this?
Change Boot order from BIOS:
This is just for example (Aspire 4710)
your BIOS interface may be slightly different
Step 1:
Plug a Flash drive into a USB port on your computer/laptop
Step 2:
Turn on your laptop then hit F2 rapidly (or Del for some other machine)
then go to Boot tab > change boot order > then hit F10 key to Save and Exit

Now you can boot from USB Flash drive, first select
1st, text mode setup (Boot from flash again after finished)
then... on the first restart, select
2nd, GUI mode setup, continue setup + 1st start of Windows
Install Windows XP as usual...


![[How-to]Unlock idea NetSetter Huawei E1550](https://blogger.googleusercontent.com/img/b/R29vZ2xl/AVvXsEh_Itsdf6dl8MlBq_0Lv3LHTVOFVlF-eBs-y822sAhFyt8wuRQK0cabaxpDPOTvAQ_4nkxzIwsmq2YX78UY-o7XJ0Bq_PTuwrBoIjG36zAJEn20mpKa_hcD0AJEKS8KV3fTh1Z1P7NovJjq/s72-c/how-to-unlock-idea-net-setter.jpg)