How to remove proxy settings from your browser

*  Removing proxy settings


How to remove proxy settings from your browser

1. What is a proxy server?

A proxy server is a server which requests for data are passed through. There are various reasons why a proxy may be used, some companies will use a proxy for security reasons. If you are using a proxy service through an ISP, this is typically done to reduce the amount of bandwidth used across the Provider's network.
E.g. if there is a common file being downloaded, such as updates to Microsoft Windows, a proxy server may store a copy of the downloaded file. This means it doesn't have to be downloaded from the Microsoft servers each time it is requested.

2. Removing proxies in Internet Explorer 7

Start Internet Explorer. Click Tools then select Internet Options:

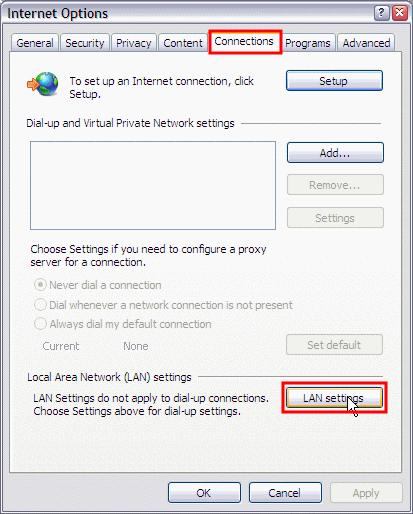
Click the Connections tab, then click LAN settings:

 Make sure the Use a proxy server for your LAN box is unticked and click OK:

Click OK to return to the main Internet Explorer window:


You have now stopped using any proxy settings which may have been present.


3. Removing proxies in Safari

Start Safari. Click the Safari menu and select Preferences:


Click the Advanced tab:


 Click the Change Settings button:


Now change your settings, see the information below the diagram for details:


  1. Select your connection method, if using a wired connection this will be Built-in Ethernet, for wireless choose Airport.
  2. Click the Proxies tab.
  3. Ensure each proxy in the list is unticked.
  4. Once you are done, click Apply Now to finish.
You have now stopped using any proxy settings which may have been present.

4. Removing proxies in Firefox

Start Firefox. Click Tools and select Options:


Click the Advanced tab:


In the Advanced tab click the Network tab:

Click the Settings button:

Click Direct connection to the Internet then click the OK button to confirm this change:


You have now stopped using any proxy settings which may have been present.


How to get WhatsApp voice calling on your jailbroken iPhone

How to get WhatsApp voice calling on your jailbroken iPhone


If you’re jailbroken, and have a little patience, you can get WhatsApp’s new in-beta voice calling feature on your iPhone right now. To do so, you’ll need to download the WhatsApp beta, download a package from Cydia, and following a couple of additional steps.
After following this tutorial, you will be able to access voice calling in WhatsApp. I can personally verify that this technique works, and was able to shoot a video walkthrough showing you the steps along with a live phone call.


Note: in most circumstances you will need AppSync installed to install the beta. You can get AppSync by adding this repo to Cydia: http://cydia.angelxwind.net
Step 1: Download and install the WhatsApp beta by clicking here while on your iPhone
             You can get AppSync by adding this repo to Cydia: http://cydia.angelxwind.net
Step 2: Add the following repo to your list of Cydia sources: http://apt.imokhles.com (see note below)
Step 3: Install the WhatsApp Call Enabler package, and enable it via Settings
Step 4: Login to WhatsApp and message a friend with activated calling and they can call to activate you.
Step 5: The contact will (hopefully) return your call and then the calling feature will be activated
It’s pretty simple. The hardest part is just being patient enough to wait for the return phone call.
Special thanks to reddit user akshitgupta95 for being so kind to assist with this. What do you think?
Update: Some are stating that this can be done without using the tweak, and thus, without needing a jailbroken device. I’ve not been able to independently confirm that, but you may want to try it on your device. I recommend trying that first before using the tweak referenced above. Also, you can receive a call from anyone who has the calling activated, so if you have a friend with it, you can have them call you instead of using the number referenced in the post and video. Hope that helps!


How To Activate WhatsApp Voice Calling

WhatsApp is rolling out its voice calling feature on Android — here’s how to activate it


WhatsApp Calling, the new invitation-only feature of WhatsApp that adds free phone call capabilities to the app that was previously only capable of messaging, has officially been launched.
The feature can be accessed by users running WhatsApp version 2.11.528 from the Google Play Store, or version 2.11.531 if downloaded directly from the official website of WhatsApp.
The rollout of the feature was first tested by WhatsApp in India early last month, with the feature then already tagged as an invitation-only. Users that wish to test the WhatsApp call feature first had to receive a call from another user to activate the feature, even if the user already had the latest version of WhatsApp installed.
With the official launch of WhatsApp Calling, the process of triggering the feature to be activated is to receive a call from another WhatsApp user that already has the feature unlocked, showing no change to t;he process that was implemented for WhatsApp Calling's testing. However, if the user being called up does not have the latest version of WhatsApp installed, a notification will be sent to request the user to update the app before the call is made.
According to Android news website Android Police, after a user receives a call from another WhatsApp user with the WhatsApp Calling feature already activated, the user interface for the app changes, either instantly or after the user closes and then re-opens WhatsApp. The new user interface displays three tabs, labeled as calls, chats and contacts.
The call feature has been integrated well into WhatsApp, with the tab for WhatsApp Calling showing all incoming, outgoing and missed calls with their exact times. Calls that are ongoing are placed in the app's notification panel until the call is ended, and calls that are missed leave notifications that can later be checked by the user. While in a call, users can choose to mute their microphones or to turn on the loudspeaker.
Accessing the call feature can be done through the messages with any of the user's contact, as a call button will appear as one of the options in the action bar for that user beside the attach option and the menu.
Users that tap on the avatar of a contact will also be shown a profile image of the user that is bigger in size, with options of either sending them a message or calling them displayed, along with viewing their information.
The call button for contacts now leads by default to a WhatApp call, as opposed to a smartphone call in the past.

Related posts:   How to get WhatsApp voice calling on your jailbroken iPhone


Use Dual 2 Whatsapp Account – OGWhatsApp Update 2015

Dual Whatsapp Account By OGWhatsApp [NO ROOT]

OGWhatsAppWhatsapp is now a days a big source of sending and receiving messages. It becomes a trend to chat with the friends. 90% of younger generation is now using whatsappapplication in their mobile. And they use it on a regular basis.
Here now the biggest question comes in everyone’s mind is that…

can we use multiple whatsapp in a mobile??
  • can we use whatsapp dual sim??
  • can we have dual whatsapp account??
  • can we use 2 whatsapp account in single phone??
Recommended: WhatsApp Trick
The more and more questions arises. So here we are having a solution for your question.
” The solution is OG WhatsApp 

What is OGWhatsApp??

  • OGWhatsapp is a modded version of Whatsapp messenger for Android devices.
  • It is used to use 2 whatsapp account in one single android device i.e. dual whatsapp account for whatsapp dual sim
  • OGWhatsapp doesn’t require to ROOT your android device. [NO NEED OF ROOT]


Feature of OGWhatsApp:

  • 2 whatsapp account in one device (Android Device)
  • Whatsapp dual sim
  • Facility to backup and restore messages and data
  • Select app icon
  • and many more…

STEPS TO INSTALL OGWHATSAPP IN YOUR ANDROID DEVICES FOR 2 WHATSAPP ACCOUNT:

1. First take the full backup for your messages and data before going through OG WhatsApp:
2. Clear whatsApp data:


3. Go to /sdcard/WhatsApp folder and rename it to /sdcard/OGWhatsAp:
4. Uninstall Official WhatsApp
5. Install OGWhatsApp (Download links are given at bottom)


6. It will ask for your number. Give the old number which you have installed in official Whatsappearlier.
7. Click OK
8. Now your OGWhatsApp is ready for old number
9. For second number to use, go to play store and download official WhatsApp application
10. It will ask for your number. Give the new second number.
Thatsheet: Now your mobile having multiple – 2 whatsapp account in single device (Whatsapp Dual Sim)


IF YOU HAVE DOUBT, CHECK OUT THIS VIDEO FOR OGWHATSAPP


If the above given trick whatsapp account in one device i.e. whatsapp dual sim works for you then do share it with your friends.
If you have any query or facing any problem with given best mobile tricks, comment here. We will guide you at our best.

If you like this post “Whatsapp Dual Sim – 2 Wahtsapp Account by OGWhatsApp“, please do share this trick via below social media buttons | OGWhatsApp
TAGS:
  • ogwhatsapp apk
  • ogwhatsapp 2.11.432
  • ogwhatsapp iphone
  • ogwhatsapp updated working.apk
  • ogwhatsapp 2015
  • ogwhatsapp review
  • ogwhatsapp v2.11.395
  • ogwhatsapp update
  • ogwhatsapp download
Install Bluestacks in Windows 8.1/8/7 Without Graphic Card Error 25000


Install Bluestacks in Windows 8.1/8/7 Without Graphic Card Error 25000


install bluestacksThese days Bluestacks become one of the must have softwares for Windows PC. I have been using this bluestacks software in my windows computer to install my favorite Android applications. Today, I will show you how to install bluestacks in Windows 8.1 or Windows 8 PC/Laptop. Actually, installing this software is not a difficult task when you have all updated drivers in your Windows PC. This main problem comes when you have outdated graphic card drivers in your computer. I will show this tutorial from the beginning to ending with troubleshoot guide. Even you can install this in MAC also but I am not gonna show you about MAC. This is only for Windows PC users. Let’s start the installation procedure.

download bluestacks windows 8.1

Download Bluestacks for Windows 8.1/7/8 Laptop/PC

Go to official website and download the bluestacks app player using below link.

Minimum Requirements to install Bluestacks in PC/Laptop

  • Your PC must have 1.6 GHz or more processor for better performance.
  • Minimum 2GB RAM is must but 2GB is not enough for good performance. 4 GB is better.
  • You must have all latest versions of graphic drivers.
  • Bluestacks is run time software to install it you should have high speed internet connection. At least 126 KBPS download speed is required.
If your Computer has all these specifications. Just go ahead and install the software.
First try to install Bluestacks by double clicking on downloaded file. If you didn’t get errors then it’s good and no need to follow the below tutorial. Simply checkout some other useful tutorials.

  • If you get any graphic card error like below then you should check this easy tutorial carefully.
Error 25000 Bluestacks currently doesn’t recognize your graphic card. It is possible your graphic drivers may need to be updated. Please update them and try to install again.
graphic card error 25000
If you get this error you can solve this issue very easily.
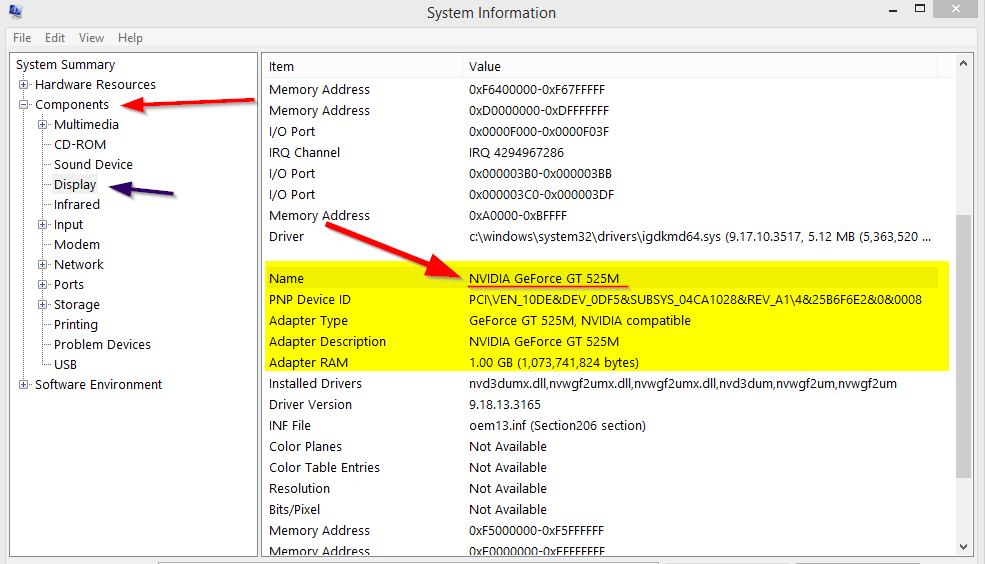
First find out your graphic card specifications of your hardware graphic card (like exact model number). To find out your Graphic card details in Windows 8.1 or 8 or 7 >> Open Command Prompt and type msinfo32. Then a windows will open head over to display tab like in the below screenshot and not graphic card details. Note down your graphic card name exactly .
windows 8.1 system info

Fix  Graphic Card Error 25000 in Bluestacks

Now if you are using NVIDIA company graphic card drive then go to the official site . Click here for to download NVIDIA latest version drivers.
If you are using AMD graphic cards then use this link to download AMD drivers. Just go to official sites and search for your PC drivers and install them.
If you are using some other hardware then simply go to Google and search that name +driver download.
Download suitable graphic card for your Windows 8.1 or Windows 7 or Windows 8 laptop or PC. Install the graphic drivers and again try to install Bluestacks this time you won’t get kind of errors . You can simply install bluestacks and enjoy the great software.
There are many offline installers available for bluestacks around the Internet. Please don’t download and install any kind of offline installers for bluestacks because they are containing viruses.
After follow all these steps, if you are still getting any errors please let me know in comments I will surely help you within hours. I hope this tutorial helped to you. Kindly share this tutorial on social media
How to install WhatsApp on PC with and without Bluestacks


How to install WhatsApp on PC with and without Bluestacks


WhatsApp is a free smartphone messenger available for Android. Almost everyone knows about WhatsApp nowadays. With the help of WhatsApp, we can send unlimited messages to our friends and parents everyday for free. Of course it uses our device’s internet connection. We can also send pictures, audio notes, and video messages. This application is free to use for the 1st year and after that it costs us only $0.99/year. And that price is dead cheap when compared to our SMS costs every year.
But have you ever wondered how cool it would be if we can install WhatsApp in PC ? Yes, you heard it correct there are a few ways to install WhatsApp on PC and use it in full extent as you would do in your Android Smartphone. Actually there are 3 ways to install WhatsApp on PC, not just one.
Before going to show you these 3 ways. Let us discuss a few reasons why we should really use WhatsApp.
  • NO Hidden Costs. Free for the entire 1st year and after that just $0.99/year (dead cheap).
  • Ability to send Multimedia messages (Pictures, Audio notes, Videos) to your friends and contacts.
  • Group Chat : We can actually chat with all our friends at once.
  • No international charges : And again no hidden costs and scams in WhatsApp. We can chat with our friends all over the world as long as they have WhatsApp installed.
  • No PINS and Usernames : WhatsApp works with our phone number just how SMS would and integrates flawlessly with the Phone address book.
  • And much more features : We can share location, exchange contacts,  Custom notification sounds, MMS to many contacts at once etc..;
Now let’s continue to our main task “Install WhatsApp on PC"

Install WhatsApp on PC with Bluestacks

Bluestacks is a popular software through which we can install and use Android Apps on our PC or Laptop.
  • First of all go to Bluestacks.com.
  • Download and install the software.32
  • Now start the program and search for WhatsApp. (In the current version of Bluestack, we need to enable the play store first to install the apps from it.)
  • Install the WhatsApp in the same way as on Smartphone.
See the screenshots of bluestacks in action below:

Recent Bluestacks Interface


Search for WhatsApp on Bluestacks


WhatsApp on PC

Install WhatsApp on PC without Bluestacks

Though installing WhatsApp on PC using Bluestacks is the recommended method, there are still some complaints of freezing screen, unusual usage of memory etc..;
So lets try installing whatsapp on pc without bluestacks software.
There are actually two alternatives to bluestacks that offer almost same functionality. They are :
Of the above two ways, using Youwave is not recommended, because it’s not a free software. It comes with 10 days trial. So its upto you to check Youwave or not.
And next comes the Wassapp. Unlike Youwave, Wassapp is a free software which is easy to install just as any other software.
After installation, start the program and register mobile number by entering the login details of your whatsapp account
and start chatting with your friends on your PC.
That’s it from now on you can easily use the services of WhatsApp on your PC itself. So what are you waiting for? Follow this guide and enjoy free texting with your friends.
Share this article if you find this useful. And also share your views in the comment box too. Thank you :)
Multiple Whatsapp by  Rooting An Android

Hello friends today i am going to share the method to run multiple whatsapp acoount in an android(after rooting)


Personally tested on managing 4 whatsapp accounts simultaneously in my single android phone. And it worked smoothly using this android trick. You can maintain as many as you like. There are some ways to use multiple whatsapp accounts in dual sim. But the method I’m going to show you in a minute works even with single sim phones. But before proceeding, let me tell you that this method works only on rooted android phones. It’s because we are going to utilize an app for this trick and the app works only in android phones with root access. Unless a non-root version of this app is released, this trick can’t be used in all android phones. Root your phone so that you can take advantage of this trick. Not just for this one trick but for all the things rooting has to offer to make your life exciting!


Android trick to run multiple whatsapp account 
Using Switchme app

Requirements :
  • You must have rooted your device (mobile/tablet). Without root access you cannot use this method . And must be Dual Sim mobile
  • Speed depends on space in Internal memory of device .
  • Whatsapp for your device. (Of course)
Short note about switchme app here we can know more about this app. SwitchMe allows you to log in and out of multiple user spaces just as you would on a desktop computer, But it need root access . Each account will have its own settings, applications and data. The data from the other profile is not accessible to current profile.
Here we go for WhatsApp with multiple user.
Step 1 :
Open this app. It will ask for Superuser request. Make it grant
Step 2 :
Now create a user profile with your name. This profile is an administrator account which contains all the current apps and settings. If you are currently using WhatsApp, it will be present here in this profile.
Step 3 :
Create another profile in SwitchMe with some other name. Select this account and choose Switch option shown below.
whatsapp_1whatsapp_2
Step 4 :
Your device will be rebooted automatically and take few minutes for booting.
Step 5 :
Here you will not see any app that you have installed in primary account. Now install Whatsapp again and register it for different SIM. (Remember only one WhatsApp account can be registered per number).
Step 6 :
  • If SIM you are registering for WhatsApp is not present in your mobile.
  • Don’t worry.  Select Call Me option. You will get a call on that number. Hear verification code on call and note it down. Now enter it in Whatsapp. With this you will successfully register WhatsApp.
That’s it! Now you can use multiple WhatsApp accounts on your Android device. If you want to use the previous account you can switch the profile, But for free version of switchme app you can use only 2 user account .

Related postOG WhatsApp Without Root